Generate AutoIT GUI and Assign Actions to Form Elements
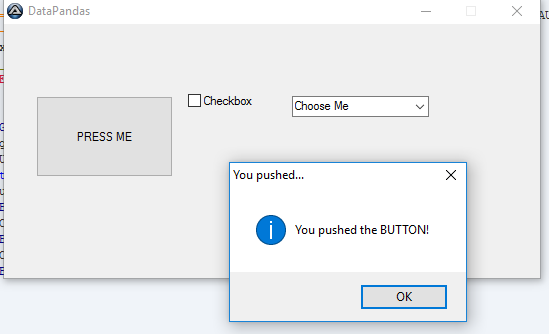
This is a quick code to create a BUTTON , CHECKBOX and COMBO BOX and assign some action to them using “MessageLoop Format”.
The general message loop format is
|
1 2 3 4 5 |
While 1 $iMsg = GUIGetMsg() ... ... WEnd |
Action is put into the WHILE LOOP using the SWITCH and CASE STATEMENT.
The GUIGetMsg() function polls the GUI to see if any events have occurred. If an event has occurred it is assigned to the variable $nMsg and the status of the variable is checked in the SWITCH – CASE STATEMENT.
The script executes and displays the appropriate Message Box when the value in the variable in the CASE STATEMENT matches the value stored in the $nMsg variable
The GUI resulting from the code below is generated using KodaForm designer which can be downloaded from here: Koda form designer
|
1 2 3 4 5 6 7 8 9 10 11 12 13 14 15 16 17 18 19 20 21 22 23 24 25 26 27 28 29 |
#include #include #include #include #include #Region ### START Koda GUI section ### Form= Global $Form1 = GUICreate("DataPandas", 536, 254, 192, 124) ; this creates the GUI Global $Button1 = GUICtrlCreateButton("PRESS ME", 32, 72, 137, 81) Global $Combo1 = GUICtrlCreateCombo("Choose Me", 288, 72, 137, 25, BitOR($CBS_DROPDOWN,$CBS_AUTOHSCROLL)) GUICtrlSetData(-1, "AutoIT is Awesome") Global $Checkbox1 = GUICtrlCreateCheckbox("Checkbox", 184, 40, 89, 73) GUISetState(@SW_SHOW) ; this displays the GUI #EndRegion ### END Koda GUI section ### While 1 $nMsg = GUIGetMsg() Switch $nMsg Case $GUI_EVENT_CLOSE Exit Case $Button1 MsgBox(64,"You pushed...", "You pushed the BUTTON!") Case $Combo1 MsgBox(64, "You selected..", "You selected an item from the COMBO BOX") Case $Checkbox1 MsgBox(64, "You selected..", "You ticked the checkbox") EndSwitch WEnd |
Result from the code above can been seen as follows:


